作者:Cathy Feraday Miller
为动物制作动画很有趣,但也是一项复杂的技术活。光是想象这些动物的四肢如何运动就足以难倒动画师了。与那些多足怪物相比,我们更容易制作出类似于人物的角色动画,因为我们可以凭直觉把握两足动物的运动方式。
如果角色的行动方式与人类相似,动画师就比较容易根据自己的运动体验制作出其运动效果,但如果角色是一种四足生物,而你自己又没有这种直觉可参照时又要怎么办呢?你要怎样让它的行动方式真实可信?这方面或许可以从一些参考资料和高端的媒体播放设备入手。
所幸在动画社区中,我们可以获得丰富而有益的参考资料。我将在下文引用一些参考资源,并以自己制作四足动物动作的过程为例,分享如何解构“行走、疾走、慢跑、疾驰”这四种基本的动物步行方式,并分享自己的一些制作技巧。
开始
通过QuickTime等可逐帧来回拖动的媒体查看器,你可以逐帧观察动物移动方式。绘制附有方向注释的小样(大致效果图)有助于你整合信息。
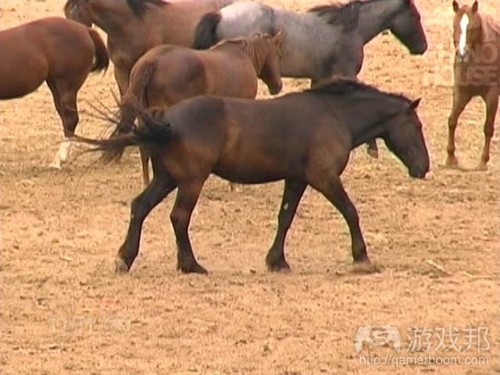
互联网上有许多提供实景动物镜头的网站,例如Rhino House这种人类及动物运动网站。我们很容易找到不少参考资料,但难处在于将这些信息转化成对动画师及其所制作的角色有用的内容。
我在进入动画绘制的创意层面之前,通常要先做足调查功课,事先要搜集并消化所有的技术细节和参考资料,我的主要步骤如下:
1.考虑哪种动物与我的动画绘制对象最为接近;
2.搜索与之相关的参考资料,常用资料来源如下:
*网站:
◦BBC http://www.bbc.co.uk/nature/animals/
◦ARKive http://www.arkive.org/
◦关于Eadweard Muybridge (游戏邦注:英国著名摄影大师)的书籍和网页内容
◦关于Animal Motion Show的DVD和网站
*人体素描和观察
*《迪斯尼动画:生命的幻觉》(Disney Animation The Illusion Of Life),Frank Thomas和Ollie Johnston, 1981年
*《动物的运动》(Animal Locomotion),Eadweard Muybridge, 1887年
*截屏
3.分析参考资料并找到最有用处的镜头片段
4.绘制小样辅助动画设计,加入我从镜头中观察到的方向以及任何不寻常的特性注释
5.制作动画
四种步态
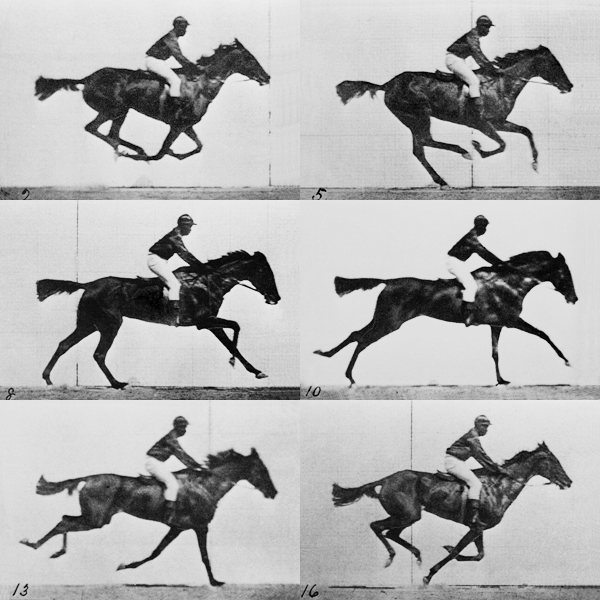
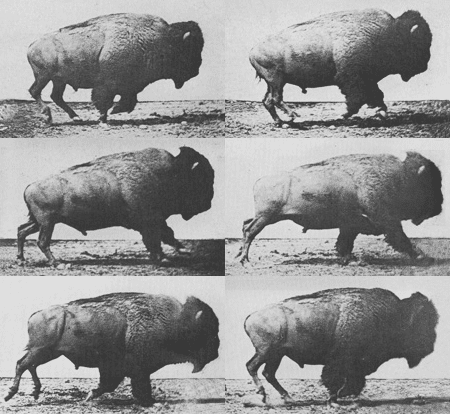
我在自己的职业生涯中发现,各种四足动物的移动方式都具有惊人的相似性。Eadweard Muybridge的摄影作品虽然年代久远,但至今仍然非常管用。
在Animal Locomotion的介绍内容中,他认为多数四足动物(无论是狗、猫、马还是犀牛)都有相同的步态。它们的蹄子或爪子触地顺序在多种步行方式中基本一致。唯一的区别在于脊椎的灵活度。但也有例外情况,比如大象和袋鼠之类的动物。
这四种行走速度,或称四种步态是多数四足动物的共性。几乎每种四足动物行走、疾走、慢跑、疾驰时的四肢移动方式都一模一样。
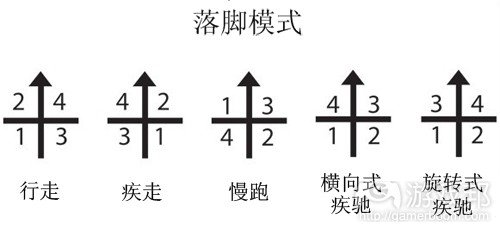
以下是根据Muybridge的《动物的运动》内容改制的示意图,在这里我们假设动物是面朝北,右腿在右,左腿在左的情况,并将每条腿落地的顺序以数字符号标示出来。
例如,在旋转式疾驰(游戏邦注:rotary gallop,指落地和提腿处于身体同侧)步态中,如果你的循环始于左后脚先着地,第二个触地的就是右后脚,然后是左前脚,最后是右前脚。
我发现在横向式疾驰(transverse gallop,指落地和提腿处于对侧)及旋转式疾驰这两种步态中,后者出现在与马有关镜头中的频率比前者更高。慢跑是最难制作的步态,因为它有太多上下变化的动作。但大象的步行并不遵循这种规则,所以要单独考虑。
当你将角色的步行方式设置为合适的顺序之后,就可以展开创意层面的工作。
为了节省时间,你可以针对每个步态制作一个步态循环动画,将脚的移动锁定在关键帧和受控制帧中,将身体和头部上下起伏的动作铺设在这些帧中。如果你使用的是通用设备,那么这些文件也能够输出用于其他动物身上(游戏邦注:只需根据动物形体差别进行一些最小化的调整),将其作为动画制作的起始点。
只要简单地调整动画帧数,以及四足行走时的间距,或者动物在疾驰时的“跳跃”距离,就能根据这个基础文件制作出不同类型或速度的行走姿态。
行走
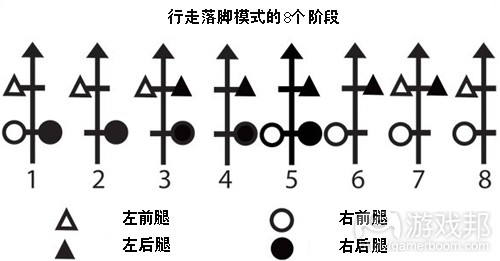
在行走状态中,动物的左后腿会先着地,然后是左前腿,第三是右后腿,最后是右前腿。行走是速度最慢的步态,所有四足动物均是如此。Muybridge根据这一信息制作了一个行走、疾走、慢跑、疾驰步态分解示意图来介绍动物的运动方式。四足动物的行走循环如下图所示:
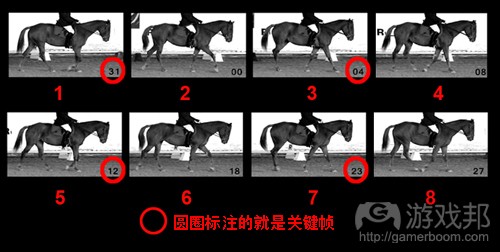
马因为拥有细长的腿,更易制作可视性的轮廓而成为最佳动物研究对象,下图将马的行走循环划分成8个阶段:
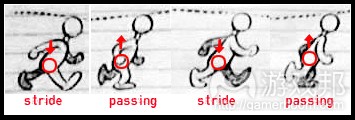
当你清楚动物的脚如何运动之后,就更容易理解下一步如何绘制动画。可以将四足动物的行走想象成人类的两个补偿行走循环。不知道有些游戏工作室是不是常用两个人扮成马来捕捉动作。美国动画家Preston Blair所画的人类行走循环生动地体现了两足动物行走过程中“跨步”和“经过”时的关键部位:跨步时臀部下沉并还原至预备姿势,进入经过姿态时又开始提臀。
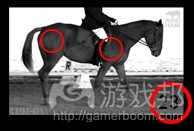
对四足动物来说,它们的臀部和前胸就是两个补偿“弹球”(相当于两足动物行走时的臀部)。从下面第23帧画面可以看到,马的前足正处于“跨步”姿态,后腿则处于“经过”状态。我在这个移动阶段中添加的圆圈以显示其前胸和臀部的起伏动作。我们其实还可以将头部视为另一个弹球,作为臀部和前胸的补偿(也就是动作惯性跟随和动作重叠,Follow Through & Overlapping Action)
制作行走动画
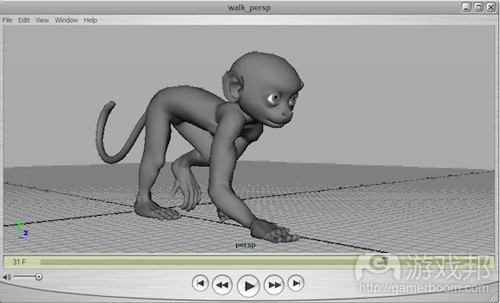
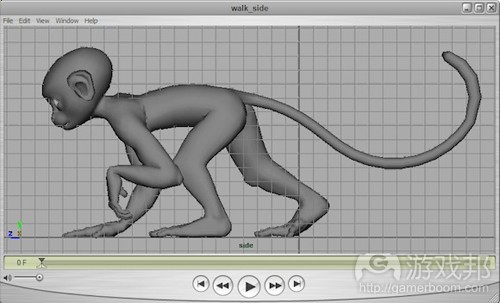
为了用3D动画说明这种运动方式,我草拟了一个40帧的慢走循环。这些循环必须对称,否则行走时就会出现一些明显的故障,例如出现一瘸一拐等现象。
不同动画师会有不同的动画绘制方法和绝窍,我喜欢像处理2D或经典动画一样使用摆姿势的方法,而非从臀部开始或者分隔下部躯体,并从整个角色入手构建四个主要姿势。
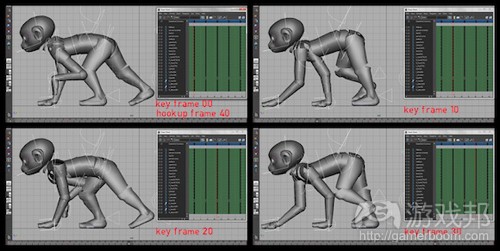
在这个阶段可以暂时忽略或者关闭脚趾和尾巴之类的细节。我创建了四个关键帧,即行走姿态:两个跨步和两个经过。我尽量让它们显得对称,但并不需要完全精确。
在同个帧上键入所有的关键元素有个好处,因为在这时候,这些关键帧易于滑动调整行走的时序。只要找到你开始添加重叠动作和动作惯性跟随这些结束细节的基本时序,就能够方便快捷地调整和控制这个行走循环。你可以在3D软件包中轻松地安排和操纵这些关键帧的顺序(我在这里使用的是Maya 2011的dope sheet)。
这些脚的姿势确定后就可以通过暂停点创建不同的行走循环。例如添加懒散的重叠动作,或者暗中潜行等行走方式。这四种基本姿势也可以作为其他行走方式的起始点。你制作其他行走循环时不需要重新创建四个基本关键姿势,你只要根据自己的特定需求在原来的基础上进行调整。你可以使用图表编辑器或者手动操作进行调整,但要记住让每个相反的姿势相互对应。
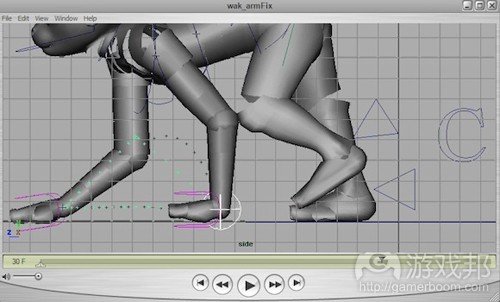
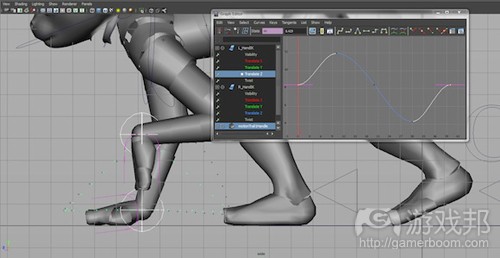
你的软件是否配备强大的图表编辑器这一点很重要。绘制动画循环时,我会花相当一部分时间清理图表以便获得对称的移动方式。在此不要忘了查看所有的通道!在此之前的阶段,角色的前臂出现了一些错误(如下图所示):
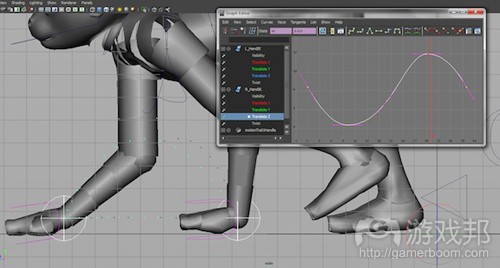
有不少方法可以弥补这个错误,但我认为在这个阶段最简便的方法是查看图表编辑器,找到其中曲线的问题所在。
图中高亮动作轨迹显示了一些可由图表编辑器解决的其他问题,例如前臂在空中的直线型移动方式。曲线动作路径看起来总会比直线型路径更自然些。至于前进过程中前臂减速的问题可以通过修复曲线来解决,这样行走循环就能流畅运转(如下图):
下一步是让行走动作更为丰满,添加重叠动作和动作惯性跟随,确保臀部和前胸上下起伏时可呈现足够的重量感。当你确信这个循环效果达到预期目标时,就可以开始绘制脚、手、手指和脚趾的动画。我通常把尾巴放在最后,一次只处理一条旋转轴。
简述:行走和奔跑
我们可以将行走和奔跑视为一个紧随经过姿态发生,略带一点加速并且受到控制的下降,类似于提腿。与所有的动作循环一样,这种前进也是非线性的。
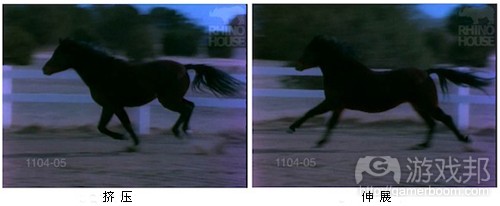
行走的速度取决于腿的长度,以及跨步姿势中各个脚之间的距离。不可能存在四足均离地的情况,与其他步态一样,此时角色的腿只能在看似未“加速”的状态下快速移动。相反,疾驰步态很大程度上取决于动物的形体和特性。如果动物需要移动的速度很快,那么它的脊柱就需要更多灵活性,并表现出更明显的挤压和伸展(Squash & Stretch)状态。
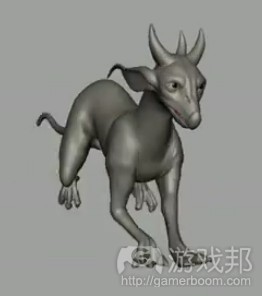
在以下图片中可以看到,这只动物的四肢在身体下聚拢成一团(挤压),这表明它正蓄势待发,准备进行一次可让身体覆盖更多地面的“跳跃”或称“伸展”(只要其形体、重量和力量足够做到这一点)。它挤压得越紧,后来的伸展就会越大,也就能够跑得越快。
我们可以通过调整脊椎的形状和移动方式,以及重叠动作、惯性跟随的次数,获得多种重量感或行走、慢跑、疾驰时的“姿态”。脊椎的弹性及动作就是区分马、犀牛和丛林猫的关键要素。
而个性这种出色动画的关键要素,不但来自关键姿态的形状,还取决于不同姿态之间的变化。例如,角色从跨步转入经过状态时有何不同?它们是抬高脚步走?还是严肃地永往直前?它们的行为是否反复无常?会不会像木偶一样蹦来蹦去,或者像比特犬一样拥有坚实的肌肉?你为动画添加的重叠元素以及它们的动作惯性就可以向用户说明它们的角色属性及其构造。
(本文为游戏邦/gamerboom.com编译,拒绝任何不保留版权的转载,如需转载请联系:游戏邦)
Animating Four-Legged Beasts
by Cathy Feraday Miller
[Animator Cathy Feraday Miller, who has worked on major feature films and video games, shares her techniques for animating quadrapeds in walk and run states, presenting both reference materials and her own animations in various states of completion.]
Animating animals is usually fun, but can often be complicated and technical. Figuring out what to do with all those legs can really trip up an animator. We can animate human-shaped characters a lot easier than multi-legged beasts because we have an intuitive knowledge of the way bipeds move.
It is easy for an animator to act out a motion when the character moves like us; feeling the action ‘in the body’ helps us understand how to animate it. So what happens when the character is a quadruped and you don’t have that intuitive feel at your disposal? How do you make that movement believable? Suitable reference and a sophisticated media player is the place to start.
Luckily for the animation community, there is a wealth of reference material that can help. I’ll walk you through my process for animating quadruped locomotion and share classic references that will help you deconstruct the fundamentals of the four gaits: walk, run, trot and gallop. I’ll also share an example of my own 3D walk animation and offer technical tips for creating believable quadruped locomotion cycles.
Getting Started
With a media viewer that can scrub single-frame backwards and forwards, like QuickTime, you can watch the movement frame by frame. Drawing thumbnail images with directional notes helps you synthesize the information.
There are now lots of websites out there that put up live-action animal footage, such as the Rhino House human and animal locomotion website, which has a built-in player that can scrub their video reference material (click the image below to check out their website and viewer). Thanks to the internet, finding reference and getting into it to see what is going on is the easy part. The hard part is converting that information into something that makes sense to the animator and for the character that is to be animated.
Horse Locomotion Walk 30 courtesy of www.rhinohouse.com
Following a process speeds up your workflow. Before I get into the creative part of animating, I usually have all of my research done. Gathering and absorbing all of the technical details and reference material beforehand frees me up to get into the creative flow of animating, with easy access to my reference material. My process is something like this:
1. Consider what animal most closely resembles the beast I need to animate.
2. Search for reference material. Here are the sources I find useful:
•Web:
◦BBC http://www.bbc.co.uk/nature/animals/
◦ARKive http://www.arkive.org/
◦Eadweard Muybridge (books and web)
◦Animal Motion Show DVDs and website
•Life drawing and observation
•Disney Animation The Illusion Of Life, Frank Thomas and Ollie Johnston, 1981
•Animal Locomotion, Eadweard Muybridge, 1887
•Video capture
3. Analyze the reference material and find the section of the footage that is most useful
4. Create thumbnail drawings to assist with my animation, including notes on direction and any unusual qualities I can see in footage.
5. Animate
The Four Gaits
In the course of my career, I’ve learned that there is a surprising similarity in how quadrupeds move, from species to species. Eadweard Muybridge’s photographic works may be a century old, but they are still relevant and extremely useful.
In his introduction to Animal Locomotion, he maintains that most quadrupeds — be they dogs, cats, horses or rhinoceroses — follow the same footfall pattern. This is the order in which the hooves or paws strike the ground while moving through the various gaits. Where they differ is in the flexibility of the spine. Visualize a rhino running, as opposed to a cheetah. The exceptions, according to Muybridge, are elephants, and animals like kangaroos.
The four speeds of movement, or the four “gaits”, are shared amongst most four-legged animals. Almost every quadruped walks, trots, canters and gallops, and their legs move in the same manner when they do it.
As you can see in the image below, adapted from Muybridge’s Animal Locomotion, the gaits have been broken down into symbols illustrating which leg strikes the ground in which order, assuming the animal is facing north with the right legs on the right and the left legs on the left.
For example, with the rotary gallop gait, if you start your cycle with the left rear foot striking the ground first, the next in sequence to hit the ground would be the right rear foot, then the right fore foot, followed by the left fore foot.
As for the transverse and rotary gallops, I’ve found the rotary gallop more often in reference material than the transverse, which I’ve mainly seen in horse footage.
The canter is the roughest gait, with a lot of up-and-down movement. Elephants don’t seem to follow these rules, and should be considered separately.
Once you get the legs moving roughly in the order that is appropriate, you can be creative with the rest of the body.
To save time, you could animate a “vanilla” gait cycle for each gait with the leg movements blocked in on keys and breakdowns only and the body and head having the rough up-and-down motion laid in on those keys. If using a universal rig, this file could then be exported onto any beast (with minimal adjustments, depending on the disparities of beast shape) and be used as a starting point for the animations.
Several different types or speeds of walks could also be created from this base file simply by playing with the amount of frames in the animation and the distance between the legs in the stride position or the distance the beast travels in the ‘leap’ part of the gallop.
The Walk
In the case of the walk gait, the rear left foot strikes first, followed by the left foreleg. The rear right leg strikes third, with the right foreleg falling last.
The walk is the slowest gait, and is shared by all quadrupeds. Muybridge breaks down this information into a chart for the walk, trot, canter and gallop gaits in the introduction of Animal Locomotion. Converted into a graphic table, a walk cycle would look like this:
Horses are great animals to study because their legs are so long and slender, creating an easily legible silhouette. Below is an example of a walk cycle broken down into 8 phases:
Image adapted from Horse Locomotion Walk 01, courtesy of www.rhinohouse.com (Click for larger image)
Once you understand what the feet are doing, it becomes easier to understand what to animate next. Think of the quadruped walk as two offset human walk cycles. I wonder how often studios have used two people in a horse costume for motion capture? Preston Blair’s iconic walk cycle with the “stride” and “passing” key positions is a great illustration of the basics of a biped walk demonstrating the following: fall into the stride and recover and rise up into the passing position.
Adapted from Preston Blair, Animation, 1948
For the quadruped, the hips and chest become two offset “bouncing balls” in the same manner as the hips in a bipedal walk. Consider circled image 23 from the horse walk cycle (below), which shows the forelegs in the “stride” position and the hind legs in the “passing” position. I’ve added circles to show the up and down motion of the hips and chest in that phase of the movement. The head could then be animated as yet another bouncing ball, offset from the hips and chest (follow-through! overlap!)
Animating A Walk
To illustrate this locomotion in 3D animation, I’ve roughed in a slow 40-frame walk cycle. Cycles must be symmetrical, or there will be a visible hitch in the walk, like a limp, or a hit in the animation.
JoJo character, courtesy of Rocket 5 Studios. Watch the animation by clicking here.
There are almost as many methods of animating as there are animators, but I prefer to approach posing as I would with 2D, or classical, animation. Posing out the whole character, rather than starting with the hips or isolating the lower body, and working on the entire character at once when creating the four major poses.
Details like toes and tails can be ignored or turned off at this stage. I create the four major keys or poses of the walk: two stride and two passing. I make them as symmetrical as possible, but they don’t have to be mathematically the same.
There is an advantage to keying all major elements on the same frame. At this point, the keys can be slid around easily to change the timing of the walk. It is quick and easy to adapt and manipulate your cycle by figuring out your basic timing to the point where you start to add finishing details like overlap and follow-through.
Keys arranged in an orderly fashion are really easy to manipulate in your 3D software package (here I am using the dope sheet in Maya 2011).
Four key poses, JoJo walk, property of Rocket 5 Studios (Click for larger image)
This is also the break off point where different kinds of walk cycles can be created now that the feet have been appropriately positioned. Variety can be added, like floppy overlap or stealthy sneak. The four basic poses can also be used as a starting point for other walks. You don’t have to recreate the four basic key poses; you only have to adapt them to your specific purposes. Use the graph editor or tweak by hand, but remember to have each opposite pose match each other.
JoJo walk cycle, four keys only, with smooth spline interpolation. Watch the animation by clicking here.
It is important that your software has a great graph editor. When animating cycles, I spend a fair amount of time cleaning up the graph to get symmetrical movement.
Don’t forget to check all channels! The above video has been carefully tweaked to remove all hits and holds. The stage just prior to this revealed a few errors with the arms:
JoJo with wonky arm movement. Watch the animation by clicking here.
There are several ways to fix errors like this but the easiest for me at this stage is to look at the graph editor and find out where there is a problem with the curve.
Note: flat tangents causing slowdown at apex of movement. (Click for larger image)
The highlighted motion trail shows other problems that can be solved by the graph editor, such as the linear movement of the arm in the air. Arcs always look more natural than linear paths of action. The solution for the slowdown in the forward progression of the arm is to fix the curve so that it can cycle smoothly, as seen below.
Grab spline handles and move them so that curve looks like it can cycle or repeat. (Click for larger image)
The next step is to flesh in the walk, adding overlap and follow-through, offsetting the head and making sure there is enough weight in the up and down movements of the hips and chest. When you are pretty sure the cycle is working the way you want it to, animate the feet, hands, fingers and toes. I usually animate the tail last, one rotational axis at a time.
Walks and Runs: In Brief
Walks and runs can be considered a controlled fall with a little acceleration happening right after the passing position, which is similar to a push-off. As with all movement cycles, the forward or Z-translation would be non-linear.
The speed of the walk is dictated by the length of the legs and how far apart the feet are planted in the stride position. There isn’t really a moment where all four legs are off the ground, as in the other gaits, and the legs can only move so fast without looking “sped up”. Conversely, the speed of gallop is largely determined by the shape and unique qualities of the beast. The faster you need the beast to go, the more flexible the spine will have to be, and the greater the squash and stretch.
Look for this when watching reference. As the legs bunch up under the beast (the squash) energy is gathered, preparing for a “leap” or “stretch” where the animal can cover as much ground as its form, weight and strength allow. The tighter the squash, the more extended the stretch and the faster the beast can travel.
Gallop cycle animated by Paul Capon on Nico
Variety in the weight or “attitude” of the walk, trot, or gallop can be achieved through the shape and movement in the spine and the amount of overlap and follow-through. The amount of flexibility and motion in the spine is key to defining the differences between a horse, a rhino, and a jungle cat.
Personality, the key ingredient in any good animation, comes not only from the shape of the key poses but also from what is happening in between the poses. How the character gets from stride to passing can define the character. Are they high-stepping? Straight forward and no-nonsense? Whimsical? Are they flopping around like a puppy or are they hard and densely muscled like a pit bull? The overlapping elements that you’ve added to the animation and their follow-through shows the audience who the character is and what it is made of.(source:gamasutra)
